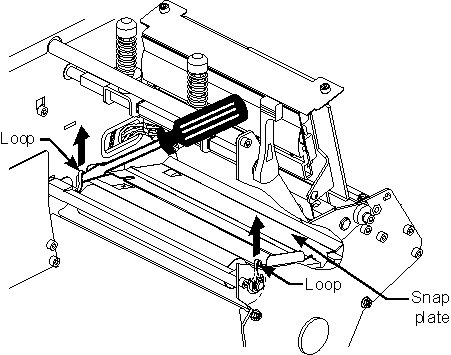

Clean the snap plate to remove label adhesive or a label that has adhered to the underside of the snap plate.
Applies to the Xi-Series and 105SL Models
Refer to Figure 1.
1.
Insert a small-blade screwdriver or similar tool into the loop on the left
side of the snap plate. Lift the snap plate.
CAUTION: Use care to not bend, twist, or otherwise deform the loops!
 |
| Figure 1. |
2. Repeat step one on the right side of the snap plate.
3. Remove the snap plate from the printer.
4. Clean the snap plate with cleaning solvent and a soft cloth.
Refer to Figure 2.
5. To reinstall the snap plate, insert the two tabs on the bottom of the snap plate into the two slots of the media pathway.
 |
| Figure 2 |
6. Slide the snap plate toward you.
7. Press down on the loops to lock the snap plate into place.
90XiIII and 96XiIII
1. To open the printhead to its fully open position, rotate the lever counterclockwise. The printhead pivots to almost vertical. Refer to Figure 3.
 |
| Figure 3 |
2. From the front of the printer, pop up the front edge of the
Snap Plate using your fingernail or a flat- blade screwdriver.
3. Lift the front edge of the Snap Plate while pulling it up and
out of the mechanism.
4. Clean the Snap Plate. Remove any stuck- on labels and remove
all adhesive residue using the using swabs soaked in cleaning
solvent (alcohol).
5. Replace the Snap Plate by placing the back legs in the
openings in the Main Media Guide while sliding it to the rear of
the openings and snapping it down into position.
NOTE: Incorrect installation may disable the Ribbon Sensor or
contribute to print quality problems.