Basic Label Length Calibration
-
Power on the printer.
-
Make sure the LCD display MAXIMUM LABEL LENGTH setting is
slightly greater than the label length you intend to use.
-
Have media and ribbon (if used) loaded in the printer.
-
Pause the printer by pressing the front panel PAUSE button.
-
Press the CALIBRATE button and allow labels to feed until
the printer stops moving the media.
-
Remove the printer from pause and press FEED several times
assuring the printer is tracking the top of form.
-
If the printer fails to calibrate perform the Full
Calibration procedure that follows.
Full Media and Ribbon Calibration
NOTE: This procedure sets the printer media and ribbon sensor gain, media type
setting, print method and label length. All steps must be performed in the following procedure, even if only one
sensor needs to be adjusted.
- Press the SETUP/EXIT key.
- Press the NEXT/SAVE key until "MEDIA AND RIBBON CALIBRATE" displays.
- To start the calibration procedure, press the RIGHT BLACK OVAL key. "LOAD
BACKING CANCEL CONTINUE" displays.
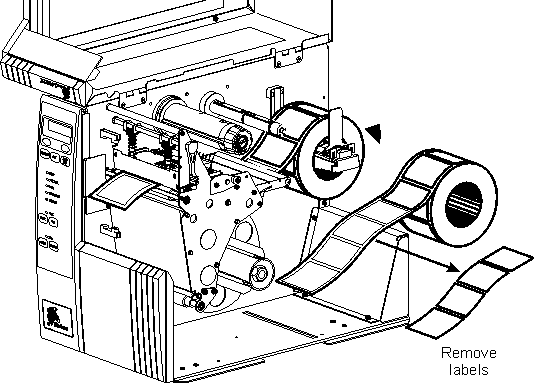
- Open the printhead. Remove approximately 8" (203 mm) of labels from the
media roll, enough so that only the backing material is threaded between the
media sensors when the media is loaded (refer to Figure 1).
|
|
|
Figure 1 |
- Press the RIGHT BLACK OVAL key. The front panel display will show "REMOVE
RIBBON CANCEL CONTINUE."
- Either remove the ribbon or slide it as far from the printer frame as
possible.
- Close the printhead, trapping the ribbon in this position.
- Press the RIGHT BLACK OVAL key. The front panel will show "CALIBRATING
PLEASE WAIT."
- When this part of the calibration process is completed, the display will
read "RELOAD ALL CONTINUE."
- Open the printhead. Pull the backing material forward until a label is
positioned between the media sensors.
- Either load the ribbon or return the ribbon to its proper position.
- Close the printhead. Press the RIGHT BLACK OVAL key to perform the next
part of the calibration sequence. "MEDIA AND RIBBON CALIBRATE" displays.
The printer is calibrated when the media stops feeding.
- Press the SETUP/EXIT key to leave the programming mode. Choose "PERMANENT"
when "SAVE CHANGES" displays.
Note: If you are using one media type and do no need to perform
sensor calibration in your application access the LCD Display menu item MEDIA
POWER UP and set it for LENGTH (measures media label length on power up) or FEED
(Feeds a known label length to the first gap over the tear bar). Do the same for
the HEAD CLOSE menu item. Doing this prevents the above calibrated sensor
settings from being changed.