If your using a desktop printer with a fixed media sensor, you can only print standard jewelry tags using the EPL commands. If you want to use a driver you will need to order labels with the cutout portion of the label left in or try the instructions for driver setup below.
If you have a model with an adjustable media sensor you can move the sensor over the largest part of the label to allow the printer to calibrate. Click here for example of sensor alignment.
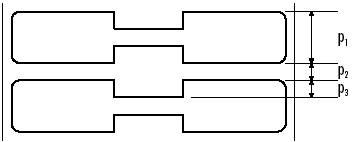
The "Q" command must use all three parameters to configure the label size and compensate for the larger gap in the center.
Command: Qp1,p2(+/-)p3
Parameters:
p1 = label height in dots
p2 = gap size in dots
p3 = offset in dots
Example where a 203 dpi printer is used
p1
= 12.5 mm (100 dots)
p2 = 3.0 mm (24 dots)
p3 = 3.0 mm (24 dots)
The Q command would be:
Q100,24+24
![]()
Setting up Jewelry Tag/Barbell style labels for EPL Printers in BAR-ONE 6
The following steps go over setting up parameters needed when using Jewelry Tag/Barbell style labels in BAR-ONE 6.
Open the BAR-ONE 6 label design program.
Have an internal EPL printer driver selected and go to File, Page Setup, Label tab.
Referring to the jewelry/barbell style label graphic below, set Media to With Gap, Width to the actual width of one label, Height (p1) to height of one label, Per Row to 1 and Per Column to 1.
Under Page tab set Width and Height to same settings as under Label tab.
Under Margins tab set Left and Top to '0'. Click on Settings button, then select General tab.
Set Adjust Feed Before Printing (p3) for gap height between "handle" portion of the barbell/butterfly label and the top edge.
Click on Advanced tab and adjust, if needed, the Distance Between Perforation And Black Mark (p2) for the gap between labels. This setting is normally calibrated automatically by the printer, but you may need to "tweak" it. Click OK to save settings.
![]()
Setting up Jewelry Tag/Barbell style labels for Create-a-Label 3
The following steps go over setting up parameters needed when using Jewelry Tag/Barbell style labels in Create-a-Label 3.0x.
Open CAL 3.0x and click on Edit, Label Setup..., Label Setup tab.
Referring to the jewelry/barbell style label graphic below, the p1 setting is the individual label Height and the p2 setting is the Vertical Gap between each label. Set accordingly along with the actual Width of a label.
Click on the Options tab. The p3 setting is the Label Offset which is the key setting required for proper gap sensing of jewelry/barbell style labels. Click OK to save your changes.
![]()
Setting up Jewelry Tag/Barbell style labels with the Zebra Universal Driver, ver 5.
Select the correct printer and select "Apply" and close the window.
In the driver, go to the "General" tab and click the "Printing Preferences" button
Determine the overall label size according to the custom label size instructions.
Note: if the label size is out of specifications for the printer, it will not appear in the drop down list in the page size drop down box.
Open the "Paper/Output" settings by clicking the + sign.
Open the drop down list next to "Paper Size" to select one of the saved standard page sizes or click the "Customize" button to enter your page dimensions,
Referring to the graphic above, determine the p1, p2 and p3 values for your label.
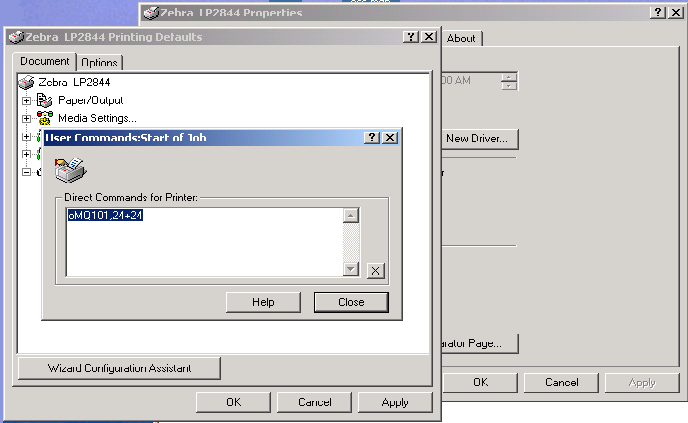
On the same "Printing Preferences" display, open up the "User Commands" option. Select "Start of Job" and click the "..." button.
In the box provided, enter "oM" to disable auto-calibration mode on the printer.
Create a script in EPL to set the label size and offset and append this to the oM command entered above.
Test your label by entering some text on the page and printing one label.
Click "Apply" and "OK" to save your settings
![]()
Setting up Jewelry Tag/Barbell style labels with the driver, V3.97a and above
In the driver, set up the overall label size according to the custom label size instructions.
Note: if the label size is out of specifications for the printer, it will not appear in the drop down list in the page size drop down box.
Referring to the graphic above, determine the p1, p2 and p3 values for your label.
Create a script in EPL to set the label size and offset.
Save the script as a text file. i.e. save as: Q.txt
Copy to the printer. i.e. from DOS type: copy Q.txt lpt1
Disable the auto-calibration mode on the printer by sending the command oM to the printer.
Save the command as a text file. i.e. save as: om.txt
Copy to the printer. i.e. from DOS type: copy om.txt lpt1
Open you application, such as word or wordpad.
Select the correct printer and select apply and close the window.
Select the custom page size you created in step 1 above.
Test your label by entering some text on the page and printing one label.
![]()